This years pictures are from the Lights Of Life, again.


An ongoing log of my progress on my 0 gauge toy train layout
This year I also had three visiting trains. John R brought his Illinois Central GP-9 which had not been run in something like 25 years (I had a lot going on, so my facts may be a little off). He also brought a kit car that he built and some scratch built loads that he had never seen run. Unfortunately, I just realized I didn't get any pictures of this very nice train.
Wayne C. brought a Williams E8 Bright Red Texas Special AA set with 4 - 18 inch passenger cars. Boy was she pretty. This one was my personal favorite, since I really like colorful passenger trains.

The star of the show was Wayne's Lionel Spirit of 1776 set produced in pieces from 1974 to 1976, that had never even been taken out of the boxes (yes folks, a brand new still in the box 37 year old train). The set included the U36B Seaboard Coast Line Engine, Caboose, and 13 cars (one for each of the original 13 colonies). Since the engine only has a single motor, it didn't have enough traction to pull all of the cars up the helix, so we double headed my engine to go with it. Here is what it looked like, and a short movie going down the helix.


 Wyatt's #4501 Southern 2x8x2 Mikado from 1991
 Les's 2368 B&O Dual Motor F3 A/B from 1956
 Les's 2383 Santa Fe Dual Motor F3 A/A from 1958
 Les thinking 'Boy I sure hope that bridge stays up there with my F Units'
 Wyatt & Roger having similar thoughts about the other bridge.
 Layer cover using from backdrop from temp layout
 Clearance issue. Ohhhhh so close :(


Tn Layout before moving in 1998


 Monster pulp wood car next to 15 inch and over 12 inch passenger car.
The second problem I had I noticed during the last club meeting held here. My winter area accessory lights kept cycling on and off. The problem was caused by 2 houses containing color wheels to give the affect of Christmas lights were drawing too much current. My first attempt at a fix was to run separate power to them, and using an HO transformer to power up only those 2 houses. It turned out that the 2 houses alone were causing too much current for that transformer, also. I then resorted to changing out the light bulbs in the houses. It turns out they were both using high intensity 10 watt halogen bulbs. I swapped them out and used the standard Lionel 'Christmas Light' bulbs that are used in the newer engines, and putting the houses back to the original transformer. The bulbs draw a whole lot less current, and are still sufficiently bright enough to create the desired effect. The picture below shows 1 of the houses with its original light bulb.
 Christmas house with original bulb
 The sign and cars all have LEDs in them, and it really looks sharp with the room lights on.
 When I hung it in the train room, I discovered the problem that when you shut the room lights off, all you see is the LEDs.
 The diner picture was taken at dusk, and the walls behind the picture are white, so it is very dark and hard to illuminate picture without lighting the whole room. After multiple attempts I finally decided to use a K-Line 2 light spotlight tower (#22326), and replace the bulbs with 2 Radio Shack 276-0017 high brightness (7000 mcd), low angle (30 degrees) LEDs. The result is shown above.
 I started out with 2 burnt out light bulbs. I broke the glass out of them using a pair of pliers held in a trash can and wearing safety glasses. I put a piece of small diameter heat shrink over the wire going to the center post of the socket and soldered one side of the LED to the wire. I placed another piece of heat shrink over the other leg of the LED, and soldered a 2.2 K Resister to it. Then I soldered the other end of the resistor to the outside of the socket. I did not shrine either piece of the heat shrink, which allowed me to push the LED into the socket while keeping the wires insulated. The results was one ugly light bulb !!
 I then screwed the LED into the light tower socket. I cut a piece of large diameter heat shrink (shown), and then placed it on the LED (no heat) so only the front of the LED is visible.
 A view of the light Tower from the front. Notice the LEDs are very focused, with very little light from the reflectors. The left one does not have the heat shink sleave applied, and there is still very little light bouncing off th e reflector. The tower is in approximately where it will be permanently located.
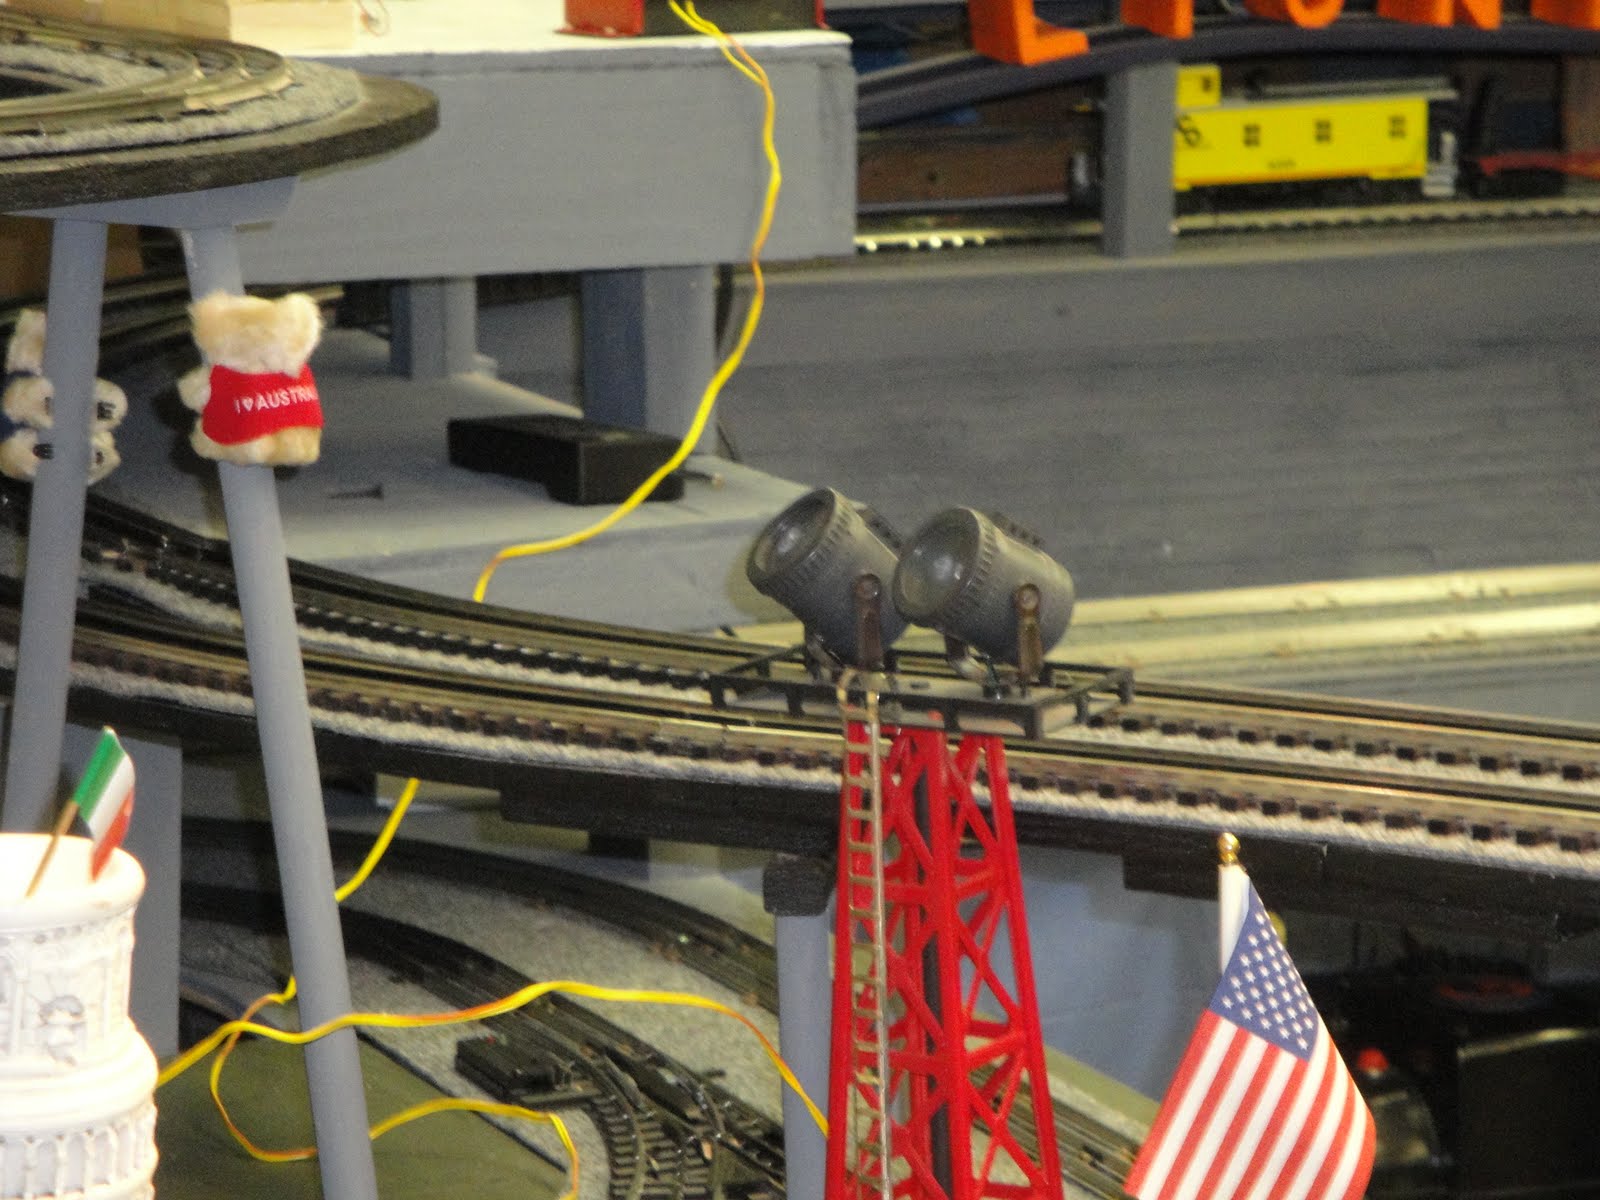 View from side of tower with sleaves over both LEDs. Notice there is hardly any light visible from the side of the LEDs.


Update-In December 2020, after this video was made, I renamed the layout to North Pole, Tinseltown, Sabastian, and Bigville. Due to the COVI...


