Friday, March 13, 2009
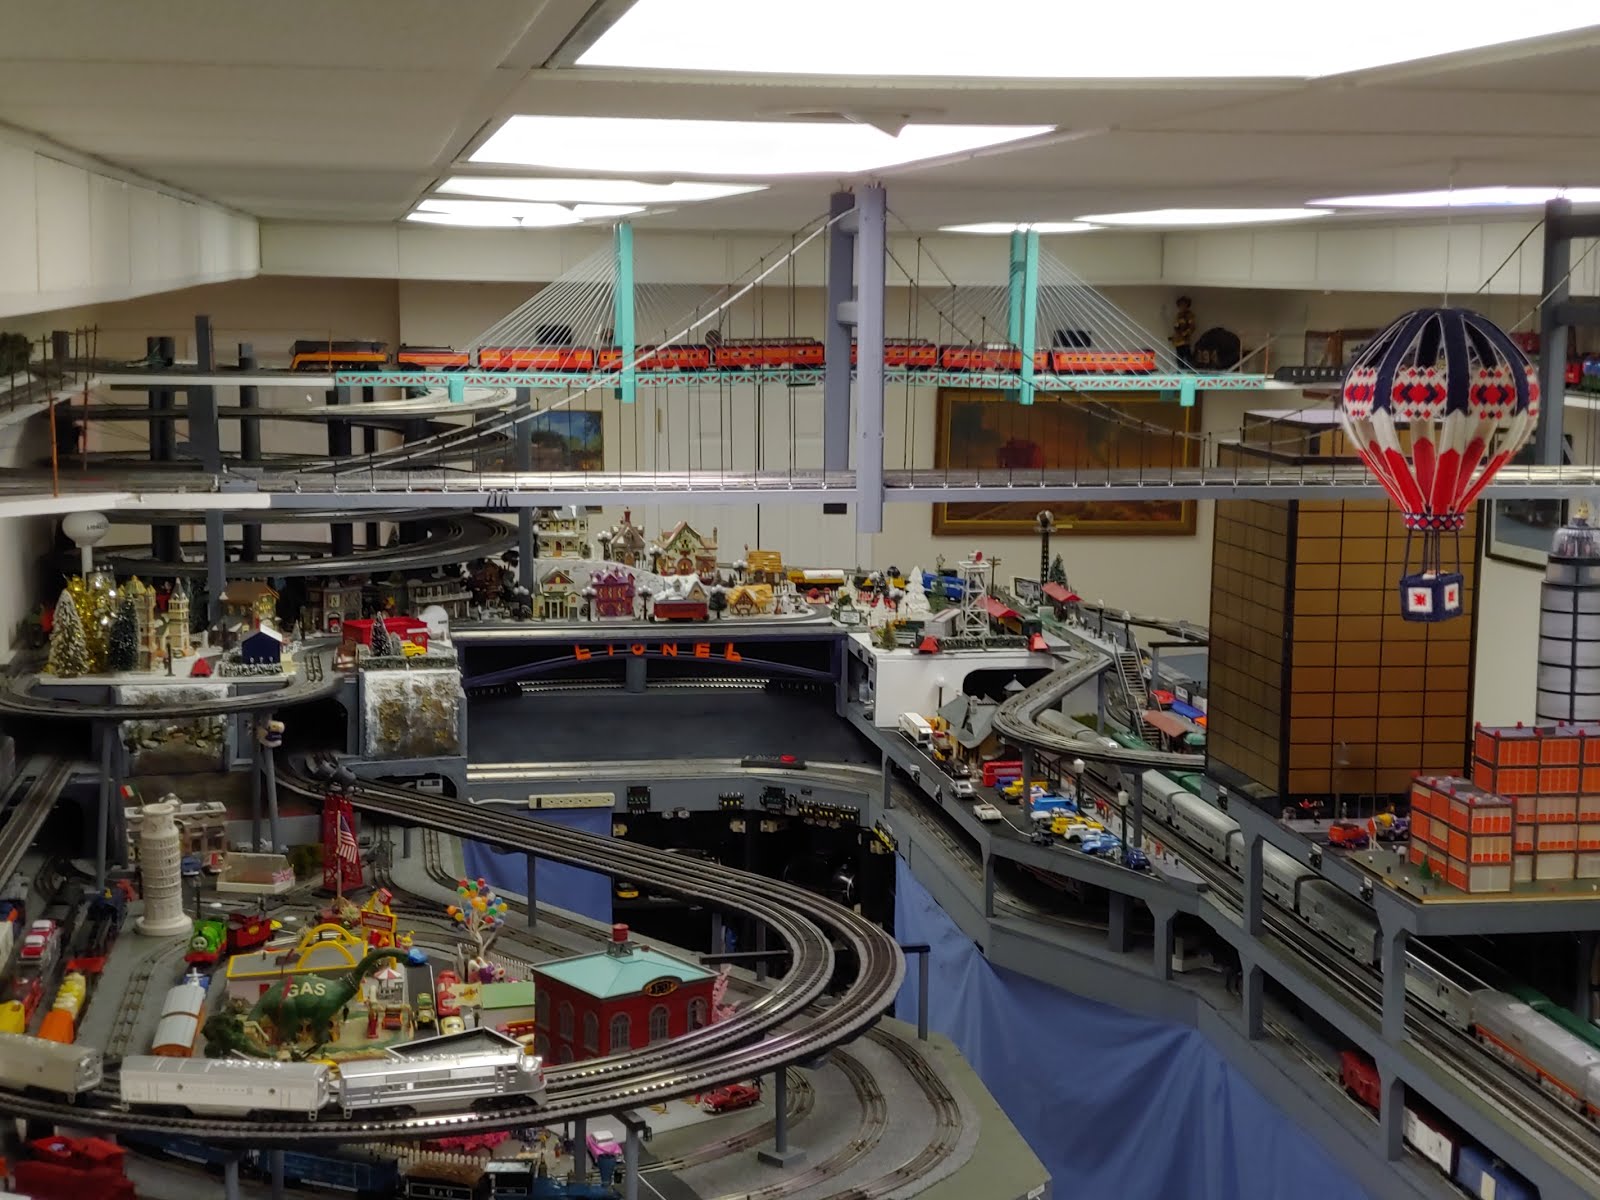
NTS & B Arch Bridge
I needed 1 more bridge, 4 foot long to cross the center of the layout. I decided on either an arch bridge, or a deck bridge with minimum supports so the area behind and underneath would not be blocked. My daughter Jennifer surprised me on my birthday by coming in with her family for a visit. I was showing her and her fiance Bruce what I had in mind for a bridge, so they decided to build it as a birthday present. Bruce cut the letters from a 2x4 using a hand held saber saw. The deck and ends were 1x4 pine, and the arches were made from some plastic 1/2 x 3/4 trim I had bought for another uses. Kathy suggested the Lionel colors. Jennifer did a great job with the paint, and now I have the bridge :) My son Scott and his wife Maria also visited, and Scott contributed the following pictures.

Sunday, March 1, 2009
NTS & B North Pole Yard Train location detection
I needed a yard on the North Pole (ceiling) level of the layout so I could have trains other than the Polar Express ready to run. Because I had to work around typical obstacles such as lights and water shut off valves, The length of the yard was limited to just barely fit the Polar Express, so accurate train detection was required.
The most obvious solution, video cameras is expensive and requires space for cameras and a monitor. Since the tracks were curved, about 3 cameras would have been needed to get a clear shot of the turnouts. Since there is only about 9 1/2 inches from track to ceiling, the cameras would have to be very close to the tops of the trains, and still would not have a clear view of the tracks (See top picture).
The second solution was using mirrors (the trains would provide the smoke). This also did not work, since the angle required for the mirror was too great to be able to see the trains at the control center.
I then decided to use LEDs or light bulbs, and use short insulated track sections at the end of each siding, similar and next to the non-derailing tracks. The problem then became how to mount them and where to locate them so they would be vi sable to the control center. I contemplated mounting LEDS in the ceiling, creating a light bridge at each end of the yard, or using light poles. The problem was still having the trains in front obstruct the view of the bulbs, or limited viewing angle and intensity of the LEDs, or having the bulbs too far from the turnouts to be able to accurately judge when the train would get to the insulated section.
The solution finally presented itself over the Christmas holidays in the form of a string of LED Christmas lights. The LEDs were cylindrical in shape so were very bright at a wide viewing angle. Of course, they also come with sockets, which happened to be just the right length to go through the 1 inch board without sticking up above it. Mounting just required making the proper size hole in the board, and then hot gluing the sockets in, since there is no heat generated by the LEDs. They also allowed placing each LED close to the turnout, which accurately marks the end of the track when placing the train. See bottom pictures for results

The most obvious solution, video cameras is expensive and requires space for cameras and a monitor. Since the tracks were curved, about 3 cameras would have been needed to get a clear shot of the turnouts. Since there is only about 9 1/2 inches from track to ceiling, the cameras would have to be very close to the tops of the trains, and still would not have a clear view of the tracks (See top picture).
The second solution was using mirrors (the trains would provide the smoke). This also did not work, since the angle required for the mirror was too great to be able to see the trains at the control center.
I then decided to use LEDs or light bulbs, and use short insulated track sections at the end of each siding, similar and next to the non-derailing tracks. The problem then became how to mount them and where to locate them so they would be vi sable to the control center. I contemplated mounting LEDS in the ceiling, creating a light bridge at each end of the yard, or using light poles. The problem was still having the trains in front obstruct the view of the bulbs, or limited viewing angle and intensity of the LEDs, or having the bulbs too far from the turnouts to be able to accurately judge when the train would get to the insulated section.
The solution finally presented itself over the Christmas holidays in the form of a string of LED Christmas lights. The LEDs were cylindrical in shape so were very bright at a wide viewing angle. Of course, they also come with sockets, which happened to be just the right length to go through the 1 inch board without sticking up above it. Mounting just required making the proper size hole in the board, and then hot gluing the sockets in, since there is no heat generated by the LEDs. They also allowed placing each LED close to the turnout, which accurately marks the end of the track when placing the train. See bottom pictures for results
Monday, February 2, 2009
NTS & B Helix lower turn around loop finished
The lower helix loop is now completed and raised over the (future) mainline passenger yard. The supports were made from 3/4 inch dowels and pieces of 1/3 cut at a 60 degree angle, and drilled with a 3/4 inch hole. The 1/3 pieces were glued to the dowels, and then screwed into the bottom of the raised plywood. 3/4 inch holes were also drilled into the station platforms, which were screwed into the lower plywood, also from the bottom. The dowels were then glued into the holes in the platforms. Some of the overhead was not over the station platforms, so the a hole was drilled directly into the lower plywood, about 1/2 through using a flat bottomed bit called a Fostner Bit, and the dowel was glued in the hole. Some of the raised track was directly over and parallel to the lower tracks, so a 1/2 inch by 3/4 inch piece was placed across 2 dowel supports. and screwed into the dowels, and the raised plywood.
The top picture shows an overall view of the layout, including the subway, mainline, raised track, trestle leading into the helix, the helix, and the cable stayed bridge. The lower 2 pictures show the raised track from the mainline level,

The top picture shows an overall view of the layout, including the subway, mainline, raised track, trestle leading into the helix, the helix, and the cable stayed bridge. The lower 2 pictures show the raised track from the mainline level,
Sunday, February 1, 2009
A new generation of train lovers (?)
Santa brought my grandson a NASCAR set for Christmas (after all, he was 6 months old). He (and his dad) absolutely loved it, and he is already working the throttle. Might have even hooked his big sister. My daughter says it must skip a generation, since neither of my kids showed much interest in trains. His dad had also picked up a used set for Christmas, so they had 2 sets running together.

Sunday, January 18, 2009
NTS & B Helix lower turn around loop
Jan 2009-The bottom return loop for the helix is finally laid in. In case anyone was wondering where the 2 bottom helix tracks were going, the next 2 pictures should answer any questions. A bunch more work needs to be done, such as final fit, supports, paint, and roadbed, but a train can FINALLY transverse the complete helix loop. The bottom 2 pictures show the Polar Express on her maiden voyage over the the lower section. A movie will follow shortly.

Thursday, January 15, 2009
NTS & B Current Layout Size and large picture
Jan 2009-I have been asked a couple times how big the layout is so far, and I couldn't come up with a size, since it is an odd shape. So I went ahead and measured, and made the following rough drawing with the sizes included. All sizes are in feet. The overall room size is approximately 15 ft by 40 ft, and the layout will fill up most of it. See the Aug 16, 2008 entry for a scale drawing of the complete planned layout. I also added a picture of the layout as it currently stands, so you can get better idea of the overall size.


Wednesday, January 14, 2009
NTS & B Cable Stayed bridge complete
Finally completed the second suspension bridge. It was much easier to build than the traditional suspension bridge (see bottom of this post for measurements). The upper level of the helix loop is almost done, with the exception of a couple street lights and the telephone pole wires. More on that next week


Measurements:
- Holes on towers are spaced every 1/2 inch and start at 1 1/2 inch from top
- Holes are deck spaced every 2 inches and start at 1 3/4 inch from edge of tower
- Tower is 17 1/2 inch tall from top of deck, and hangs down 1 3/4 inch below deck
- Deck to bottom of cross brace between towers is 13 inches
- Deck is made of 1x8x8, and is app 12 1/2 ft long total
- Overall length of deck from first cord to last cord on 1 tower is 45 inches
- Towers are made of 2 1x2's shaved and shaped with a router.. The inside on rests on the deck, and has a grove routed in it for the all thread support rod and wires for the blinking LEDS. The cross piece is screwed to the inside pieces. The outside pieces are longer, and hang below the deck.
- The cables are made from weed eater cord, and are over 50 foot for each tower. They are knotted underneath on each end.
- If the cables are strung so tight that you can play a tune, chances are they are too tight, and will warp the ends of the bridge up. I usually park a heavy engine in the middle of the bridge to help prevent this from happening.
- Hint: If the cable says 'invisible', then you probably wont see the cables :(. Shining a light on them won't help that a bit, either.
Sunday, January 4, 2009
NTS & B Jan 2009 North Pole Loop Yard
Track is in, and turnouts and siding power is wired. Still having issues with derailments so need to work on track leveling, and possibly another turnout replacement. Wall track just (barely) fits the Polar Express (with about an inch to spare). Front 3 tracks are shorter, but shortest should still hold a steam engine and 3 passenger cars (I hope). Also still need to wire in location sensors. I bought a string of Christmas LEDS that have a very wide visibility angle, which will be mounted under the appropriate tracks under the shelf.
Turnout and track power are controlled by switches mounted under the bridge. The power station containing the transformers is located on the floor almost directly underneath.
Saturday, December 20, 2008
NTS & B Merry Chrismas 2008
Another year has passed, and the layout is still in process. I'd like to wish everyone a merry Christmas, and happy new years. Wait-is that my present falling off Santa's sleigh ???

Thursday, November 20, 2008
NTS & B Helix exit track / graduated trestle complete
The lower helix exit is mounted on the Lionel Graduated Trestle set, bringing the helix loop down to the winter level. At this level, the track will make a raised loop over the mainline yard, and then go back up the other track on the trestle. The winter table top has been repainted white, to faciliate the upcoming snow.

Subscribe to:
Posts (Atom)